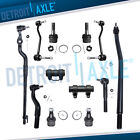
Fit For:
2002 Chevrolet Trailblazer LS Sport Utility 4-Door 4.2L 256Cu. In. l6
2002 Chevrolet Trailblazer LT Sport Utility 4-Door 4.2L 256Cu. In. l6
2002 Chevrolet Trailblazer LTZ Sport Utility 4-Door 4.2L 256Cu. In. l6
2002 Chevrolet Trailblazer North Face Sport Utility 4-Door 4.2L 256Cu. In. l6
2002 Chevrolet Trailblazer EXT LT Sport Utility 4-Door 4.2L 256Cu. In. l6
2002 Chevrolet Trailblazer EXT North Face Sport Utility 4-Door 4.2L 256Cu. In. l6
2002 GMC Envoy SLE Sport Utility 4-Door 4.2L 256Cu. In. l6
2002 GMC Envoy SLT Sport Utility 4-Door 4.2L 256Cu. In. l6
2002 GMC Envoy XL SLE Sport Utility 4-Door 4.2L 256Cu. In. l6
2002 GMC Envoy XL SLT Sport Utility 4-Door 4.2L 256Cu. In. l6
2002 Oldsmobile Bravada Base Sport Utility 4-Door 4.2L 256Cu. In. l6
Fault judgment:
- When encountering a limp road, the vibration is strong, and it is shaking up and down, and the body is twisted.
- When the car is driving, every time it vibrates up and down, the suspension device makes a "guckling" noise
- If there is a problem with the front wheel suspension system, the direction will deviate to one side, and continuous correction is required to maintain normal driving.
A normal shock absorber will generate heat when it is working. If it does not generate heat or if oil leaks from the shock absorber, it means that the shock absorber has been damaged. During the inspection, the condition of the shock absorber rubber sleeve should also be checked. If it is found to be damaged, it should be replaced together with the shock absorber in time. In addition, it may be that the fastening bolts are loose.
Know how to replace the ball joint:
Engage the parking brake. Set the parking brake on the vehicle and set the wheel block on one of the tires you will not remove. After the tire screws are loosened, jack up the jack. At this time, completely remove the wheel nut, and then remove the tire from the vehicle.
- step 2: Removing the Old Ball Joint
- Pop loose the ball joint. You will most likely need to use a hammer and a special tool called a “pickle fork” or tie rod separator to get enough leverage to maneuver.
- With the wrench, remove the largest nut from the joint, replace with the new nut, and then drive the pickle fork between the control arm and the steering knuckle. And before hammering away,you will need to put the castellated nut on.
- Remove the allen bolts and slide the control arm free. Loosen bolts or drill out rivets holding the ball joint in place, and slide out the ball joint.
- step 3: Installing the New Joint
- Guide the new joint through the knuckle hole. Slide the new rubber boot over the ball joint’s stud and guide the new ball joint back up through the steering knuckle hole, where it came from.
- Bolt the joint into place using the hardware included.
- Torque the bolts to the proper specifications.Generally, the specs will be about 44 pounds per foot on the screws and around 80 for other bolts. Always defer to the owner's manual for accurate numbers, however.
- Screw in the new grease fitting and pump grease into the assembly.

Notes:
- Please be sure to check carefully whether the part is suitable for your car model before placing an order.
- If you have any questions after receiving the goods, please contact us in time, we will give you a satisfactory answer.


